Runner
Deep learning algorithms usually share similar pipelines for training, validation and testing.
Therefore, MMengine designed Runner to simplify the construction of these pipelines.
In most cases, users can use our default Runner directly.
If you find it not feasible to implement your ideas, you can also modify it or customize your own runner.
Before introducing the design of Runner, let’s walk through some examples to better understand why we should use runner.
Below is a few lines of pseudo codes for training models in PyTorch:
model = ResNet()
optimizer = SGD(model.parameters(), lr=0.01, momentum=0.9)
train_dataset = ImageNetDataset(...)
train_dataloader = DataLoader(train_dataset, ...)

for i in range(max_epochs):
    for data_batch in train_dataloader:
        optimizer.zero_grad()
        outputs = model(data_batch)
        loss = loss_func(outputs, data_batch)
        loss.backward()
        optimizer.step()
Pseudo codes for model validation in PyTorch:
model = ResNet()
model.load_state_dict(torch.load(CKPT_PATH))
model.eval()

test_dataset = ImageNetDataset(...)
test_dataloader = DataLoader(test_dataset, ...)

for data_batch in test_dataloader:
    outputs = model(data_batch)
    acc = calculate_acc(outputs, data_batch)
Pseudo codes for model inference in PyTorch:
model = ResNet()
model.load_state_dict(torch.load(CKPT_PATH))
model.eval()

for img in imgs:
    prediction = model(img)
The observation from the above 3 pieces of codes is that they are similar.
They can all be divided into some distinct steps, such as model construction, data loading and loop iterations.
Although the above examples are based on image classification tasks, the same holds for many other tasks as well, including object detection, image segmentation, etc.
Based on the observation above, we propose runner, which structures the training, validation and testing pipeline.
With runner, the only thing you need to do is to prepare necessary components (models, data, etc.) of your pipeline, and leave the schedule and execution to Runner.
You are free of constructing similar pipelines one and another time.
You are free of annoying details like the differences between distributed and non-distributed training.
You can focus on your own awesome ideas.
These are all achieved by runner and various practical modules in MMEngine.
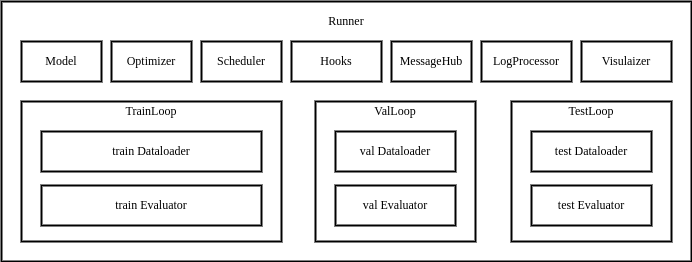
The Runner in MMEngine contains various modules required for training, testing and validation, as well as loop controllers(Loop) and Hook, as shown in the figure above.
It provides 3 APIs for users: train, val and test, each correspond to a specific Loop.
You can use Runner either by providing a config file, or by providing manually constructed modules.
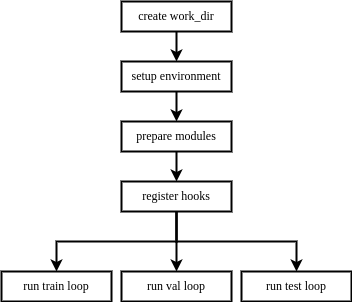
Once activated, the Runner will automatically setup the runtime environment, build/compose your modules, execute the loop iterations in Loop and call registered hooks during iterations.
The execution order of Runner is as follows:
A feature of Runner is that it will always lazily initialize modules managed by itself.
To be specific, Runner won’t build every module on initialization, and it won’t build a module until it is needed in current Loop.
Therefore, if you are running only one of the train, val, or test pipelines, you only need to provide the relevant configs/modules.
Loop
In MMEngine, we abstract the execution process of the task into Loop, based on the observation that most deep learning tasks can be summarized as a model iterating over datasets.
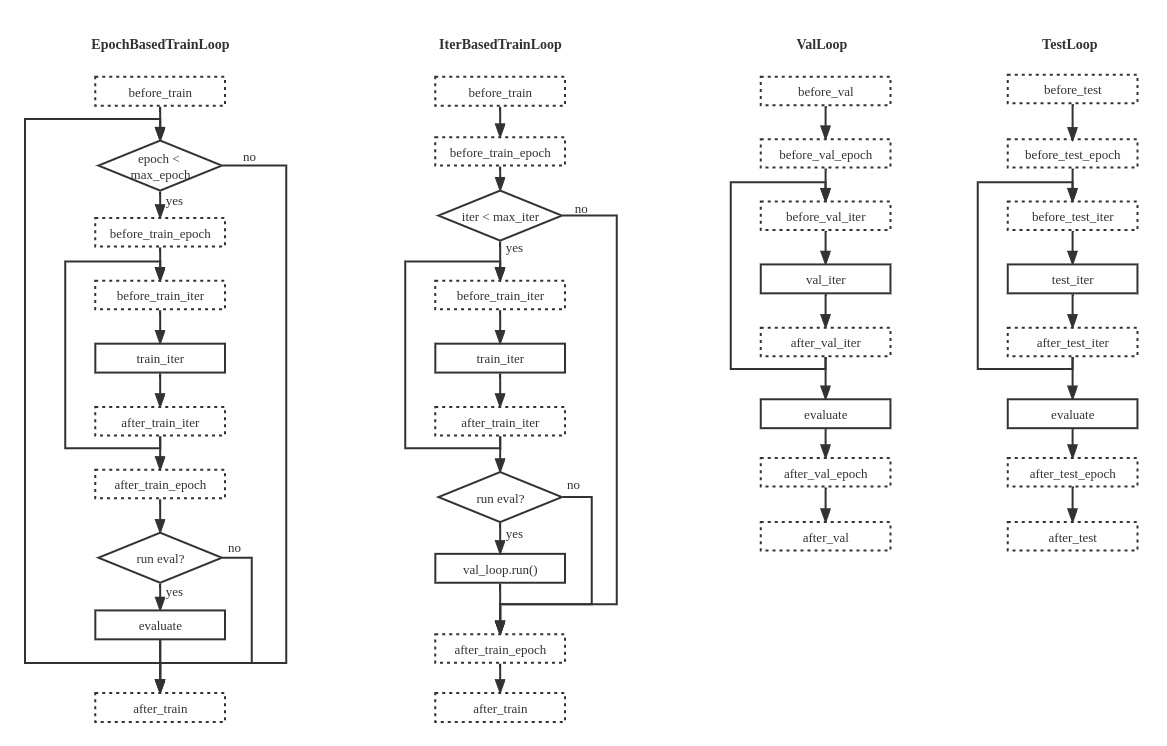
We provide 4 built-in loops in MMEngine:
EpochBasedTrainLoop
IterBasedTrainLoop
ValLoop
TestLoop
The built-in runner and loops are capable of most deep learning tasks, but surely not all. Some tasks need extra modifications and refactorizations. Therefore, we make it possible for users to customize their own pipelines for model training, validation and testing.
You can write your own pipeline by subclassing BaseLoop, which needs 2 arguments for initialization: 1) runner the Runner instance, and 2) dataloader the dataloader used in this loop.
You are free to add more arguments to your own loop subclass.
After defining your own loop subclass, you should register it to LOOPS(mmengine.registry.LOOPS), and specify it in config files by type field in train_cfg, val_cfg and test_cfg.
In fact, you can write any execution order, any hook position in your own loop.
However, built-in hooks may not work if you change hook positions, which may lead to inconsistent behavior during training.
Therefore, we strongly recommend you to implement you subclass with similar execution order illustrated in the figure above, and with the same hook positions defined in hook documentation.
from mmengine.registry import LOOPS, HOOKS
from mmengine.runner import BaseLoop
from mmengine.hooks import Hook


# Customized validation loop
@LOOPS.register_module()
class CustomValLoop(BaseLoop):
    def __init__(self, runner, dataloader, evaluator, dataloader2):
        super().__init__(runner, dataloader, evaluator)
        self.dataloader2 = runner.build_dataloader(dataloader2)

    def run(self):
        self.runner.call_hooks('before_val_epoch')
        for idx, data_batch in enumerate(self.dataloader):
            self.runner.call_hooks(
                'before_val_iter', batch_idx=idx, data_batch=data_batch)
            outputs = self.run_iter(idx, data_batch)
            self.runner.call_hooks(
                'after_val_iter', batch_idx=idx, data_batch=data_batch, outputs=outputs)
        metric = self.evaluator.evaluate()

        # add extra loop for validation purpose
        for idx, data_batch in enumerate(self.dataloader2):
            # add new hooks
            self.runner.call_hooks(
                'before_valloader2_iter', batch_idx=idx, data_batch=data_batch)
            self.run_iter(idx, data_batch)
            # add new hooks
            self.runner.call_hooks(
                'after_valloader2_iter', batch_idx=idx, data_batch=data_batch, outputs=outputs)
        metric2 = self.evaluator.evaluate()

        ...

        self.runner.call_hooks('after_val_epoch')


# Define a hook with extra hook positions
@HOOKS.register_module()
class CustomValHook(Hook):
    def before_valloader2_iter(self, batch_idx, data_batch):
        ...

    def after_valloader2_iter(self, batch_idx, data_batch, outputs):
        ...
The example above shows how to implement a different validation loop.
The new loop validates on two different validation datasets.
It also defines a new hook position in the second validation.
You can easily use it by setting type='CustomValLoop' in val_cfg in your config file.
# Customized validation loop
val_cfg = dict(type='CustomValLoop', dataloader2=dict(dataset=dict(type='ValDataset2'), ...))
# Customized hook with extra hook position
custom_hooks = [dict(type='CustomValHook')]
Customize Runner
Moreover, you can write your own runner by subclassing Runner if the built-in Runner is not feasible.
The method is similar to writing other modules: write your subclass inherited from Runner, overrides some functions, register it to mmengine.registry.RUNNERS and access it by assigning runner_type in your config file.
from mmengine.registry import RUNNERS
from mmengine.runner import Runner

@RUNNERS.register_module()
class CustomRunner(Runner):

    def setup_env(self):
        ...
The example above shows how to implement a customized runner which overrides the setup_env function and is registered to RUNNERS.
Now CustomRunner is prepared to be used by setting runner_type='CustomRunner' in your config file.
Further readings: Runner tutorial and Runner API documentations