Runner
Welcome to the tutorial of runner, the core of MMEngine’s user interface!
The runner, as an “integrator” in MMEngine, covers all aspects of the framework and shoulders the responsibility of organizing and scheduling nearly all modules. Therefore, the code logic in it has to take into account various situations, making it relatively hard to understand. But don’t worry! In this tutorial, we will leave out some messy details and have a quick overview of commonly used APIs, functionalities, and examples. Hopefully, this should provide you with a clear and easy-to-understand user interface. After reading through this tutorial, you will be able to:
Master the common usage and configuration of the runner
Learn the best practice - writing config files - of the runner
Know about the basic dataflow and execution order
Feel by yourself the advantages of using runner (perhaps)
Example codes of the runner
To build your training pipeline with a runner, there are typically two ways to get started:
Refer to runner’s API documentation for argument-by-argument configuration
Make your custom modifications based on some existing configurations, such as Getting started in 15 minutes and downstream repositories like MMDet
Pros and cons lie in both approaches. For the former one, beginners may be lost in a vast number of configurable arguments. For the latter one, beginners may find it hard to get a good reference, since neither an over-simplified nor an over-detailed reference is conducive to them.
We argue that the key to learning runner is using it as a memo. You should remember its most commonly used arguments and only focus on those less used when in need, since default values usually work fine. In the following, we will provide a beginner-friendly example to illustrate the most commonly used arguments of the runner, along with advanced guidelines for those less used.
A beginner-friendly example
Hint
In this tutorial, we hope you can focus more on overall architecture instead of implementation details. This “top-down” way of thinking is exactly what we advocate. Don’t worry, you will definitely have plenty of opportunities and guidance afterward to focus on modules you want to improve.
Before running the actual example below, you should first run this piece of code for the preparation of the model, dataset, and metric. However, these implementations are not important in this tutorial and you can simply look through
import torch
import torch.nn as nn
import torch.nn.functional as F
from torch.utils.data import Dataset

from mmengine.model import BaseModel
from mmengine.evaluator import BaseMetric
from mmengine.registry import MODELS, DATASETS, METRICS


@MODELS.register_module()
class MyAwesomeModel(BaseModel):
    def __init__(self, layers=4, activation='relu') -> None:
        super().__init__()
        if activation == 'relu':
            act_type = nn.ReLU
        elif activation == 'silu':
            act_type = nn.SiLU
        elif activation == 'none':
            act_type = nn.Identity
        else:
            raise NotImplementedError
        sequence = [nn.Linear(2, 64), act_type()]
        for _ in range(layers-1):
            sequence.extend([nn.Linear(64, 64), act_type()])
        self.mlp = nn.Sequential(*sequence)
        self.classifier = nn.Linear(64, 2)

    def forward(self, data, labels, mode):
        x = self.mlp(data)
        x = self.classifier(x)
        if mode == 'tensor':
            return x
        elif mode == 'predict':
            return F.softmax(x, dim=1), labels
        elif mode == 'loss':
            return {'loss': F.cross_entropy(x, labels)}


@DATASETS.register_module()
class MyDataset(Dataset):
    def __init__(self, is_train, size):
        self.is_train = is_train
        if self.is_train:
            torch.manual_seed(0)
            self.labels = torch.randint(0, 2, (size,))
        else:
            torch.manual_seed(3407)
            self.labels = torch.randint(0, 2, (size,))
        r = 3 * (self.labels+1) + torch.randn(self.labels.shape)
        theta = torch.rand(self.labels.shape) * 2 * torch.pi
        self.data = torch.vstack([r*torch.cos(theta), r*torch.sin(theta)]).T

    def __getitem__(self, index):
        return self.data[index], self.labels[index]

    def __len__(self):
        return len(self.data)


@METRICS.register_module()
class Accuracy(BaseMetric):
    def __init__(self):
        super().__init__()

    def process(self, data_batch, data_samples):
        score, gt = data_samples
        self.results.append({
            'batch_size': len(gt),
            'correct': (score.argmax(dim=1) == gt).sum().cpu(),
        })

    def compute_metrics(self, results):
        total_correct = sum(r['correct'] for r in results)
        total_size = sum(r['batch_size'] for r in results)
        return dict(accuracy=100*total_correct/total_size)
Click to show a long example. Be well prepared
from torch.utils.data import DataLoader, default_collate
from torch.optim import Adam
from mmengine.runner import Runner


runner = Runner(
    # your model
    model=MyAwesomeModel(
        layers=2,
        activation='relu'),
    # work directory for saving checkpoints and logs
    work_dir='exp/my_awesome_model',

    # training data
    train_dataloader=DataLoader(
        dataset=MyDataset(
            is_train=True,
            size=10000),
        shuffle=True,
        collate_fn=default_collate,
        batch_size=64,
        pin_memory=True,
        num_workers=2),
    # training configurations
    train_cfg=dict(
        by_epoch=True,   # display in epoch number instead of iterations
        max_epochs=10,
        val_begin=2,     # start validation from the 2nd epoch
        val_interval=1), # do validation every 1 epoch

    # OptimizerWrapper, new concept in MMEngine for richer optimization options
    # Default value works fine for most cases. You may check our documentations
    # for more details, e.g. 'AmpOptimWrapper' for enabling mixed precision
    # training.
    optim_wrapper=dict(
        optimizer=dict(
            type=Adam,
            lr=0.001)),
    # ParamScheduler to adjust learning rates or momentums during training
    param_scheduler=dict(
        type='MultiStepLR',
        by_epoch=True,
        milestones=[4, 8],
        gamma=0.1),

    # validation data
    val_dataloader=DataLoader(
        dataset=MyDataset(
            is_train=False,
            size=1000),
        shuffle=False,
        collate_fn=default_collate,
        batch_size=1000,
        pin_memory=True,
        num_workers=2),
    # validation configurations, usually leave it an empty dict
    val_cfg=dict(),
    # evaluation metrics and evaluator
    val_evaluator=dict(type=Accuracy),

    # following are advanced configurations, try to default when not in need
    # hooks are advanced usage, try to default when not in need
    default_hooks=dict(
        # the most commonly used hook for modifying checkpoint saving interval
        checkpoint=dict(type='CheckpointHook', interval=1)),

    # `luancher` and `env_cfg` responsible for distributed environment
    launcher='none',
    env_cfg=dict(
        cudnn_benchmark=False,   # whether enable cudnn_benchmark
        backend='nccl',   # distributed communication backend
        mp_cfg=dict(mp_start_method='fork')),  # multiprocessing configs
    log_level='INFO',

    # load model weights from given path. None for no loading.
    load_from=None,
    # resume training from the given path
    resume=False
)

# start training your model
runner.train()
Explanations on example codes
Really a long piece of code, isn’t it! However, if you read through the above example, you may have already understood the training process in general even without knowing any implementation details, thanks to the compactness and readability of runner codes (probably). This is what MMEngine expects: a structured, modular, and standardized training process that allows for more reliable reproductions and clearer comparisons.
The above example may lead you to the following confusion:
There are too many arguments!
Don’t worry. As we mentioned before, use runner as a memo. The runner covers all aspects just to ensure you won’t miss something important. You don’t actually need to configure everything. The simple example in 15 minutes still works fine, and it can be even more simplified by removing val_evaluator, val_dataloader, and val_cfg without breaking down. All configurable arguments are driven by your demands. Those not in your focus usually work fine by default.
Why are some arguments passed as dicts?
Well, this is related to MMEngine’s style. In MMEngine, we provide 2 different styles of runner construction: a) manual construction and b) construction via registry. If you are confused, the following example will give a good illustration:
from mmengine.model import BaseModel
from mmengine.runner import Runner
from mmengine.registry import MODELS # root registry for your custom model

@MODELS.register_module() # decorator for registration
class MyAwesomeModel(BaseModel): # your custom model
    def __init__(self, layers=18, activation='silu'):
        ...

# An example of construction via registry
runner = Runner(
    model=dict(
        type='MyAwesomeModel',
        layers=50,
        activation='relu'),
    ...
)

# An example of manual construction
model = MyAwesomeModel(layers=18, activation='relu')
runner = Runner(
    model=model,
    ...
)
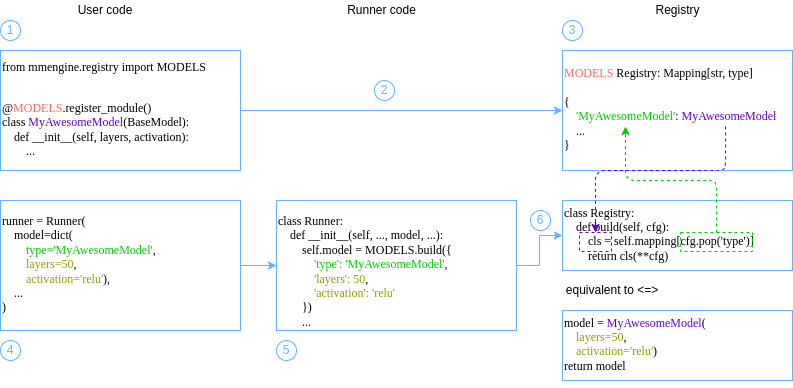
Similar to the above example, most arguments in the runner accept both 2 types of inputs. They are conceptually equivalent. The difference is, in the former style, the module (passed in as a dict) will be built in the runner when actually needed, while in the latter style, the module has been built before being passed to the runner. The following figure illustrates the core idea of registry: it maintains the mapping between a module’s build method and its registry name. If you want to learn more about the full usage of the registry, you are recommended to read Registry tutorial.
You might still be confused after the explanation. Why should we let the Runner build modules from dicts? What are the benefits? If you have such questions, then we are proud to answer: “Absolutely - no benefits!” In fact, module construction via registry only works to its best advantage when combined with a configuration file. It is still far from the best practice to write as the above example. We provide it here just to make sure you can read and get used to this writing style, which may facilitate your understanding of the actual best practice we will soon talk about - the configuration file. Stay tuned!
If you as a beginner do not immediately understand, it doesn’t matter too much, because manual construction is still a good choice, especially for small-scale development and trial-and-error due to its being IDE friendly. However, you are still expected to read and get used to the writing style via registry, so that you can avoid being unnecessarily confused and puzzled in subsequent tutorials.
Where can I find the possible configuration options for the xxx argument?
You will find extensive instructions and examples in those tutorials of the corresponding modules. You can also find all possible arguments in Runner’s API documentation. If neither of the above resolves your query, you are always encouraged to start a topic in our discussion forum. It also helps us improve documentation.
I come from repositoried like MMDet/MMCls... Why does this example differ from what I've been exposed to?
Downstream repositories in OpenMMLab have widely adopted the writing style of config files. In the following chapter, we will show the usage of config files, the best practice of the runner in MMEngine, based on the above example with a slight variation.
Best practice of the Runner - config files
MMEngine provides a powerful config file system that supports Python syntax. You can almost seamlessly (which we will illustrate below) convert from the previous sample code to a config file. Here is an example:
# Save the following codes in example_config.py
# Almost copied from the above example, with some commas removed
model = dict(type='MyAwesomeModel',
    layers=2,
    activation='relu')
work_dir = 'exp/my_awesome_model'

train_dataloader = dict(
    dataset=dict(type='MyDataset',
        is_train=True,
        size=10000),
    sampler=dict(
        type='DefaultSampler',
        shuffle=True),
    collate_fn=dict(type='default_collate'),
    batch_size=64,
    pin_memory=True,
    num_workers=2)
train_cfg = dict(
    by_epoch=True,
    max_epochs=10,
    val_begin=2,
    val_interval=1)
optim_wrapper = dict(
    optimizer=dict(
        type='Adam',
        lr=0.001))
param_scheduler = dict(
    type='MultiStepLR',
    by_epoch=True,
    milestones=[4, 8],
    gamma=0.1)

val_dataloader = dict(
    dataset=dict(type='MyDataset',
        is_train=False,
        size=1000),
    sampler=dict(
        type='DefaultSampler',
        shuffle=False),
    collate_fn=dict(type='default_collate'),
    batch_size=1000,
    pin_memory=True,
    num_workers=2)
val_cfg = dict()
val_evaluator = dict(type='Accuracy')

default_hooks = dict(
    checkpoint=dict(type='CheckpointHook', interval=1))
launcher = 'none'
env_cfg = dict(
    cudnn_benchmark=False,
    backend='nccl',
    mp_cfg=dict(mp_start_method='fork'))
log_level = 'INFO'
load_from = None
resume = False
Given the above config file, we can simply load configurations and run the training pipeline in a few lines of codes as follows:
from mmengine.config import Config
from mmengine.runner import Runner
config = Config.fromfile('example_config.py')
runner = Runner.from_cfg(config)
runner.train()
Note
Although it supports Python syntax, a valid config file needs to meet the condition that all variables must be Python built-in types such as str, dict and int. Therefore, the config system is highly dependent on the registry mechanism to enable construction from built-in types to other types such as nn.Module.
Note
When using config files, you typically don’t need to manually register every module. For instance, all optimizers in torch.optim including Adam and SGD have already been registered in mmengine.optim. The rule of thumb is, try to directly access modules provided by PyTorch, and only start to register them manually after error occurs.
Note
When using config files, the implementations of your custom modules may be stored in separate files and thus not registered properly, which will lead to errors in the build process. You may find solutions in Config tutorial.
Warning
Although sharing nearly the same codes, from_cfg and __init__ differs in some default values like env_cfg.
Writing config files of the runner has been widely adopted in downstream repositories in OpenMMLab projects. It has been a de facto convention and best practice. The config files are far more featured than illustrated above. You can refer to Config tutorial for more advanced features including keywords inheriting and overriding.
Basic dataflow
Hint
In this chapter, we’ll dive deeper into the runner to illustrate dataflow and data format convention between modules managed by the runner. It may be relatively abstract and dry if you haven’t built a training pipeline with MMEngine. Therefore, you are free to skip for now and read it in conjunction with practice in the future when in need.
Now let’s dive slightly deeper into the runner, and illustrate the dataflow and data format convention under the hood (or, under the engine)!
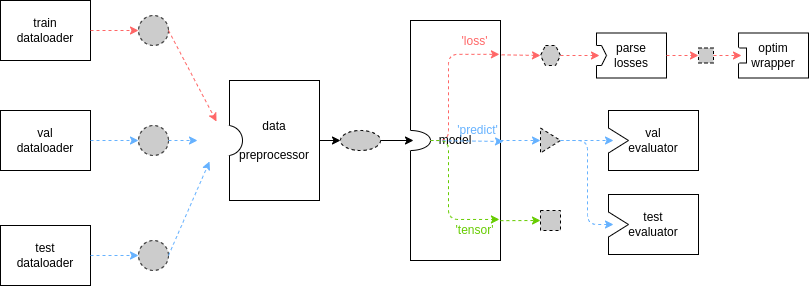
The diagram above illustrates the basic dataflow of the runner, where the dashed border, gray filled shapes represent different data formats, while solid boxes represent modules/methods. Due to the great flexibility and extensibility of MMEngine, you can always inherit some key base classes and override their methods, so the above diagram doesn’t always hold. It only holds when you are not customizing your own Runner or TrainLoop, and you are not overriding train_step, val_step or test_step method in your custom model. Actually, this is common for most tasks like detection and segmentation, as referred to Model tutorial.
Can you state the exact type of each data item shown in the diagram?
Unfortunately, this is not possible. Although we did heavy type annotations in MMEngine, Python is still a highly dynamic programming language, and deep learning as a data-centric system needs to be flexible enough to deal with a wide range of complex data sources. You always have full freedom to decide when you need (and sometimes must) break type conventions. Therefore, when you are customizing your module (e.g. val_evaluator), you need to make sure its input is compatible with upstream (e.g. model) output and its output can be parsed by downstream. MMEngine puts the flexibility of handling data in the hands of the user, and thus also requires the user to ensure compatibility of dataflow, which, in fact, is not that difficult once you get started.
The uniformity of data formats has always been a problem in deep learning. We are trying to improve it in MMEngine in our own way. If you are interested, you can refer to BaseDataset and BaseDataElement - but please note that they are mainly geared towards advanced users.
What's the data format convention between dataloader, model and evaluator?
For the basic dataflow shown in the diagram above, the data transfer between the above three modules can be represented by the following pseudo-code:
# training
for data_batch in train_dataloader:
    data_batch = data_preprocessor(data_batch)
    if isinstance(data_batch, dict):
        losses = model.forward(**data_batch, mode='loss')
    elif isinstance(data_batch, (list, tuple)):
        losses = model.forward(*data_batch, mode='loss')
    else:
        raise TypeError()

# validation
for data_batch in val_dataloader:
    data_batch = data_preprocessor(data_batch)
    if isinstance(data_batch, dict):
        outputs = model.forward(**data_batch, mode='predict')
    elif isinstance(data_batch, (list, tuple)):
        outputs = model.forward(**data_batch, mode='predict')
    else:
        raise TypeError()
    evaluator.process(data_samples=outputs, data_batch=data_batch)
metrics = evaluator.evaluate(len(val_dataloader.dataset))
The key points of the above pseudo-code is:
Outputs of data_preprocessor are passed to model after unpacking
The
data_samplesargument of the evaluator receives the prediction results of the model, while thedata_batchargument receives the raw data coming from dataloader
What is data_preprocessor? Can I do image pre-processing such as crop and resize in it?
Though drawn separately in the diagram, data_preprocessor is a part of the model and thus can be found in Model tutorial in DataPreprocessor chapter.
In most cases, data_preprocessor needs no special attention or manual configuration. The default data_preprocessor will only do data transfer between host and GPU devices. However, if your model has incompatible inputs format with dataloader’s output, you can also customize you own data_preprocessor for data formatting.
Image pre-processing such as crop and resize is more recommended in data transforms module, but for batch-related data transforms (e.g. batch-resize), it can be implemented here.
Why does module produce 3 different outputs? What is the meaning of "loss", "predict" and "tensor"?
As described in get started in 15 minutes, you need to implement 3 data paths in your custom model’s forward function to suit different pipelines for training, validation and testing. This is further discussed in Model tutorial.
I can see that the red line is for training process and the blue line for validation/testing, but what is the green line?
Currently model outputs in “tensor” mode has not been officially used in runner. The “tensor” mode can output some intermediate results and thus facilitating debugging process.
What if I override methods such as train_step? Will the diagram totally fail?
The behavior of default train_step, val_step and test_step covers the dataflow from data_preprocessor to model outputs and optim_wrapper. The rest of the diagram will not be spoiled.
Why use the runner? (Optional reading)
Hint
Contents in this chapter will not teach you how to use the runner and MMEngine. If you are being pushed by your employer/advisor/DDL to work out a result in a few hours, it may not help you and you can feel free to skip it. However, we highly recommend taking time to read through this chapter, since it will help you better understand the aim and style of MMEngine.
Relax, time for some philosophy
Congratulations for reading through the runner tutorial, a long, long but kind of interesting (hope so) tutorial! Please believe that all of these - this tutorial, the runner, MMEngine - are intended to make things easier for you.
The runner is the “manager” of all modules in MMEngine. In the runner, all the distinct modules - whether visible ones like model and dataset, or obscure ones like logging, distributed environment and random seed - are getting organized and scheduled. The runner deals with the complex relationship between different modules and provides you with a clear, easy-to-understand and configurable interface. The benefits of this design are:
You can modify or add your codes without spoiling your whole codebase. For example, you may start with single GPU training and you can always add a few lines of configuration codes to enable multi GPUs or even multi nodes training.
You can continuously benefit from new features without worrying about backward compatibility. Mixed precision training, visualization, state of the art distributed training methods, various device backends… We will continue to absorb the best suggestions and cutting-edge technologies from the community while ensuring backward compatibility, and provide them to you in a clear interface.
You can focus on your own awesome ideas without being bothered by other annoying and irrelevant details. The default values will handle most cases.
So, MMEngine and the runner will truly make things easier for you. With only a little effort on migration, your code and experiments will evolve with MMEngine. With a little more effort, the config file system allows you to manage your data, model, and experiments more efficiently. Convenience and reliability are the aims we strive for.
The blue one, or the red one - are you prepared to use MMEngine?
Suggestions on next steps
If you want to:
Write your own model structure
Refer to Model tutorial
Use your own datasets
Refer to Dataset and DataLoader tutorial
Change evaluation metrics
Refer to Evaluation tutorial
Do something related to optimizers or mixed-precision training
Refer to OptimWrapper tutorial
Schedule learning rates or other parameters during training
Refer to Parameter Scheduler tutorial
Something not mentioned above
“Common Usage” section to the left contains more example codes
“Advanced tutorials” to the left consists of more contents for experienced developers to make more flexible extensions to the training pipeline
Hook provides some flexible modifications without spoiling your codes
If none of the above solves your problem, you are always welcome to start a topic in our discussion forum!